Lincoln Land Bee Keepers Association
Find Us On Facebook
  • Home
  • Links
  • Educational & Reference
  • Summary of Events
  • Calendar
  • Meeting Minutes
  • Swarms - What to do
  • Swarm Capture List
  • Documents
  • Download
  • Blog - Around the Hive
  • Photos
  • Slide Show
  • Videos
  • Buy/Sell/Swap
  • Google Group
  • Contact

Check and Change Your Candy Boards

12/29/2013

0 Comments

 
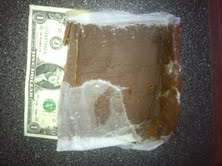
If you put candy boards on your colonies in December, be sure to check them in January.   Have a spare ready to put on in case the bees have moved up to it and consumed most of it.

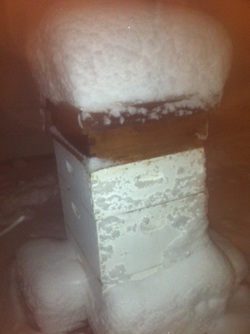
Since the cluster just moves upwards (and not sideways) in cold weather, the presence of a candy board may be the key for survival of the colony.

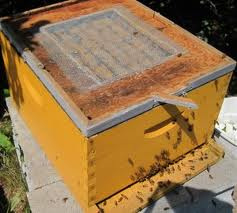
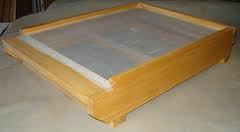
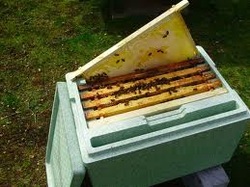
In the short video below, a candy board is changed on a colony on December 19, 2013.   The original candy board was put on this colony in the 1st week of November because it was too cold to feed syrup and this colony (a swarm caught this summer) was light on food stores.


Steve
0 Comments

What the Heck is a Bee Gum?

11/28/2013

1 Comment

 
Picture
What the heck is a bee gum, anyway?

Thanksgiving makes me think of my grandparents and how resourceful they were.  They raised eight children through the Great Depression on a coal miner's wages.

Grandma and Grandpa had a terrific garden and several fruit trees on their small plot of land.  I'm sure they were bee-friendly.


They were not beekeepers, but I'm sure they knew people who raised bees.  If so, they probably used a bee gum.


Picture
A bee gum is a log that's been hollowed out for bees to make their nest in.  The name comes from the type of tree that was typically used:  here a black gum tree, which was preferred because it lasted longer than other logs.  Other types of wood could be used as well.

The main purpose was to hollow out the center of the log, usually by burning out the center.  Others would simply harvest a tree that was naturally hollow and then cut off the portion(s) to make the hive.

Picture
Once the log was burned out, the bee keeper would nail on handles and then make some bores through the sides.  A tight fitting lid would also be made.  Holes were also drilled in the handles to insert a stick through the top portion of the hive to support the top boards of the hive.

As you can see from the image to the right, the bee gum had all the basics of a hive.
  It allows the bees to move between the nest bottom where the brood was developed.

With the sticks inserted at the top and middle, the bees will build their comb on the sticks and set up shop.


A few small holes are drilled at the bottom of the log, or notches are made, to allow the bees easy exit and entrance into the hive.
  The log is then set on a large flat surface such as a board or large rock, to provide a landing space

Picture
The bees will set up their comb in a similar way to how they set up in top bar hive.

They will bind their comb to the underside of the boards, which sit on top of the sticks inside the hive.

The harvest procedures are most likely similar to how a top bar hive is harvested as well. 


That's the skinny on Bee Gums.  This would be an interesting project to add to your bee yard this year.  I hope you try it around the bee yard.  Until next time, I'll see you around the hive!
1 Comment

Harvest Time:Prepare Adequately and  Keep it Clean!

7/30/2013

0 Comments

 
Picture
It's July, and I realized I hadn't posted in over a month.  I took June off and spent my profits from selling honey for an all-expense paid vacation to Loami, IL.  Mostly, I spent time with bees and my fledgling orchard.

So, let's go out to the hive and see what's going on.

Now that you are pulling frames of honey from your bees hard work, it's time to start your harvest.

First, make a plan.  Get your supply list together and in the truck or wagon, so you are ready at the hive.  Be prepared to sweat since you'll be there awhile. 

Beyond my normal gear: gloves and netting; my list includes the following: cooler that will hold full frames; wagon, so I don't have to carry the cooler; frame holder; alligator pliers to grab frames, extra fuel for smoker; self-lighting  propane torch for quick lighting of smoker.

I also bring a bucket with a few frames just in case the harvest is light.


Picture
Second, as I get to the hive, I usually have my smoker going.  Before I suit up, I walk over and give the girls a few puffs as a preparation for the upcoming activity.  This gives them time to settle down.   I tend to rely on smoke heavily when I harvest, and try to time the harvest during the sunniest part of the day, as lot of the bees are out foraging.  Because of this, I broke open the piggy bank and bought myself a self-lighting torch.  This way I can quickly fire up the smoker if it goes out.  This was worth the $40.

Picture
On a side note, my lovely mother-in-law, Betsy, gave me a bag full of stag-horn-sumac flowers, which are great for the smoker.  These take a minute or so to ignite, but hold the smoke for awhile and don't overwhelm the bees with harsh chemicals or nasty smells you get from burning rags or rope.  And, like most beekeepers, I'm all about "free" stuff like this.

Picture
Well, the title here said prepared and Clean.  So my third tip is to clean everything before you begin.  Why?  Well, the bees like you more when you are scent free.  And your equipment works better.  Lastly, you are handling food-stuff.  I'll go into the cleanliness part in more detail when we talk about extracting next time.  And it REALLY counts then.

Until next time, see you around the hive!
tim

0 Comments

Now That It's Warm, It's Time to Swarm!

5/14/2013

1 Comment

 
Picture
I found this swarm at my farm last night.  Even though it was in the mid-60's, these bees were ready.

Bee sure to check out this site's write up on swarms (here), if you see one and don't know what to do.  If you are a beekeeper, here's the actions you should take:

So what do you do if you want to capture the swarm?
Gather.
1.  Get a swarm box ready.  Put in some old comb and some fresh foundation, as these bees will be ready to build comb.  You'll put the swarm in this box.  While I use a modified hive body, in a pinch a good cardboard box will do.
2. Put the following in a bucket just in case: bee brush, tree saw, branch loppers, pruners.
3. Bring your ladder.
4. Bring your gloves and veil and smoker:  Even though swarms are generally gentle, I like to get fully "dressed" just in case the swarm is fractious.
   

Picture
Grab.
Time to act.  The goal here is to grab the bees without injuring them, and keeping the queen in the center of the cluster.  That way all the bees will guide in on her presence in the box. 

Once you have everything in place near the swarm, take a few moments to strategically place your swarm box under the cluster.
1. Clip small limbs that are in the way of directly accessing the bees.
2.  If possible, cut the main branch and place bees and branch directly into the box.
3. In the alternative, move the box directly under the cluster of bees and give the branch a solid shake, such that the majority of the cluster will drop into the box.  Assuming you got the majority of the bees to fall in the box, loosely cover the top of the box and let the whole operation rest for a few minutes. 
4. You'll know fairly quickly whether you got the queen or not, as the remaining bees will head to the box (if you got the queen) or back to the cluster (if you didn't).
5. Once you have them all, cover the top completely, and once nightfall comes, get ready to move the hive.

Picture
Go.
Place the bees in their new home.

Ideally you will move the hive to its new location, at least 2 miles beyond their original location.
1. Prepare the hive body location so you can move the bees into their new home with limited disruption.
2. Lift the frames of bees out of the swarm box and place into the hive body.
3. Shake or brush the remainder of the bees into the front of the hive.  The bees will then fly to where the queen is located and set up their new digs.
4.  Feed the new swarm a 1:1 sugar water to help them produce a lot of wax quickly.  Do this especially if the weather looks nasty for the coming days.
5. Watch for development and growth of the hive.  Recall that it is most likely that this swarm's queen is "old" and may need to be replaced sometime in the fall.  Likewise, check the hive in a few days, for eggs, mites, and general health. 

Well done!

As always, there is always more to learn around the hive.

See you there soon!
tim


1 Comment

Guest Post:  Fighting the Mighty Mite

4/17/2013

0 Comments

 
Picture
Thank you, Maggie, for this incredibly detailed post.  You have a lot of good information on your blog at http://viewfromthehive.wordpress.com/

I believe that mites are the single worst enemy of a hive. Mites slowly suck the bees’ hemolymph, their blood, weakening the entire hive, stressing it and rendering it vulnerable to disease. To suck their blood, mites cut an opening in the bees’ protective exoskeletons, creating wounds that allow bacteria and viri enter. The mites themselves are vectors of disease, incubathing and injecting bee diseases. Get rid of mites and your hive will be healthier and happier. I try to avoid chemical treatments. The following is a description of some natural methods I use to control mites.

Monitor a mite infestation: First, check to see if you have mites. You can do this if you open some capped drone brood during a hive inspection. Mites prefer to breed in capped drone brood (not worker brood), so as you work in the hive, if you open some drone brood, carefully inspect those fat, white drone bodies for mites. Look for tiny red spots on the pearly white bodies. If you find a single mite, you probably have a mite infestation.


Picture
Drone Larvae with Mite
Picture
Green drone comb:
Have ready two green plastic drone frames per infested hive. Green drone comb is like a drone magnet: The comb template is larger than worker bee template, encouraging the queen to lay drone eggs. Place one frame of green comb in the center of the brood area of the top hive body and let the bees have a go at it. During high drone season, spring and early summer, the bees will draw out the foundation quickly and the queen will start laying drone eggs soon. About three weeks after you have placed the first green comb in the brood box, go back and examine it. Check that most of the drone brood has been capped. If there are still more than 50% uncapped drone larvae, wait a few more days to pull it.
Once more than 50% of the drones are cappted, remove the green comb and place it in the freezer . Replace it with the second green frame. This starts the drone reproduction cycle again. Wait another three weeks more weeks have passed to pull and freeze the green comb again. At the same time, defrost the first comb and replace it in the hive. The bees will clean out the dead drone pupae and the queen will use the cells to lay another round of drones. After three more weeks, pull and freeze them again.

After two or three rounds of drone comb, replace the green frame with a normal wooden frame. Research shows that if you use drone comb to catch and freeze mites twice, you will be knocking back the mite population to about 90% as effective as a chemical treatment. If you do it a third time, even better.

The theory: The idea is to lure the mites into the drone comb. The mites vastly prefer drone comb because the drones are capped longer and they can breed longer. They wait until almost the last minute before scuttling into the drone cell just before capping. They know when to make a run for it because the drone emits a pheromone just prior to capping. Once inside the capped cell, it’s party time: the mites are free to feed off the drone and food in the cell while they reproduce. The most important thing is not to overlook pulling the drone comb out of the hive before the drones hatch. If you leave the drone comb too long and the drones hatch, you are actually encouraging mites to breed. Don’t miss the three week pull date!

The zen of the hive: I hate freezing those innocent drones. It helps to remember that bees want what is best for the hive. I truly believe that those drones would glady lay down their lives if they knew that through their sacrifice, they were improving the health and survival of the overall hive.

Scheduling: Start using the green comb early (like now). It works best during high drone production season, spring and early summer. After June, when drone production has settled down, the green comb method becomes less effective.


Picture
Sugar Sifter: Look for these at Salvation Army or any second-hand shop


Powdered sugar theory: Mites transport from hive to hive from one bee to another. The idea is to sprinkle powdered sugar on the bees. The bees hate it, and they immediately start intensive grooming. While they are grooming, they knock off mites. The mites fall to the bottom of the hive. If you have a screened bottom board, they leave the hive through the ground floor (pun intended).

Throughout the summer, I powder my bees every time I open the hive. Some beekeepers prefer to place a screen over the brood box and brush powdered sugar into the hive through the screen once a month. I don’t do it that way. Instead, I have my sugar sifter filled with powdered sugar handy whenever I open a hive, and just sprinkle it over the bees that happen to be on top of the hive just before closing. I figure eventually I hit all the bees that way.

Picture
Screened bottom boards: I recommend screened bottom boards for mite control. If you have a screened bottom board on a hive, the mites that are knocked off bees during grooming fall right out of the hive onto the ground below. Solid wood bottom boards catch the mites and make it easier for them to climb back up or hitch a ride on a bee. I leave my screened bottom boards on year round, as they also provide ventillation in the winter when condensation is an issue. My hives seem to overwinter well with screened bottom boards as long as there is no draft created by an opening higher up in the hive near the top. Some beekeepers sprinkle diatomaceous earth underneath the hive for extra protection. They idea is that diatomaceous earth might cut the mites (and hive beetle pupae) as they fall to the ground.

0 Comments

Bees were hunkered down on March 24-March 25

4/17/2013

0 Comments

 
Picture
From nice weather, to 18.5 inches of snow, to what seem like endless rain.  We are fortunate the weather is not cold enough for snow with all the rain we are getting.

The colonies in the picture are sitting at least 6 inches off the ground, but you will notice the snow almost entirely covers the bottom hive body.

Well, we are not far from swarm season, so the few nice days which may occur between now and the end of April should be used to examine your colonies and ascertain if the brood boxes need to be reversed or if you need to cull and replace old frames.

0 Comments

Iced Honey Made Easy!

3/26/2013

0 Comments

 
Picture
Easy way to make iced-honey!

0 Comments

Crisco + Sugar + Pollen + Honey-B-Healthy = Good Prevention

3/14/2013

0 Comments

 
Picture
The temperature is fluctuating between 35 and 50 on any given day.  A bit too cold to open the hive and spend a lot of time with your bees.

However, it's a very good time to prepare some sugar patties and pollen patties as a preventative for the bees.  I also add a little "Honey-B-Healthy".

Picture
Add some Honey-B-Healthy, to give the girls a boost.  It has some essential oils and other good stuff, which has been shown to aid in prevention of tracheal mites.  It also smells really good.

Elsewhere on the site, you will find a basic recipe for the sugar patties.  Basically, you mix a lot of sugar with some Crisco or other Vegetable based shortening, and make some patties with it.  Make the patties and put these on wax paper.  I do make some slits in the paper to help the bees.  You can then cut these to the size you need.  Place the patties on the top of the bars of the hive.


Picture
True story:  When you mix all this together, it looks like icing.  In fact, I had it sitting out on the counter while I went to get some wax paper, and three of my kids tried the "icing".  Reports are out that they had fresh breath and no colds for the next several weeks.!

Finally, the shortening in the mix supplies bees with some fat.  It is also supposed to help with some cleanliness issues associated with Varroa Mites.

As to the pollen patties,  I order these.  It helps the bees feed whatever brood are gestating, and provides some protein based food for them while we wait for the first pollen of the spring.

Again, put these on the top of the bars of the hive.  I peel off the paper as these are a bit more sturdy than your sugar patties and less subject to melting.  The bees will make quick work of both of these, but why make them chew through the paper?  So don't.  As with my earlier post on Candy Boards, I may even try to "stick" this patty to the underside of the inner cover.

0 Comments

Bee Hive Basics:  Wood You Make Your Own or Wood You Buy It?

3/2/2013

2 Comments

 
Picture
So now you are pretty sure you want to keep bees.  And the bee box - called a hive body, looks complicated.  But it's not.  See the picture on the left.  These are the main parts.

Most of these are easily made in your wood working shop.  Even I can make them with a circular saw, jigsaw, hammer and nails.  Okay, maybe a drill too.

Plans are easily found on the web.

I won't go into each of the parts.  And while we do not yet have any plans on the site at this time, I'll see about loading some soon.

You may want to check out The Beekeeper's Handbook, 4th, which you can get at Barnes & Noble or Amazon for around $20.  I copied this image from page 39 of that book. We may be adding a book store to this site, so check back with us later.

Picture
This image shows the lower half of the hive.  Many of us do not use a hive stand, and instead use cinder blocks, which are sturdy, easy and cheap. 

That being said, if you have a stand, put some peach-can-sized containers under each leg, and put some used motor oil in it, which will protect the hive from ants and other critters.


Picture
Here's what one of my completed hives looks like.  The rough looking ones on the bottom I made from scratch.  The nice looking one on top I ordered from one of the bee keeping supply companies. 

If you look close you can see how they have a rabbeted corner. 

Note how this unit sits on cinder blocks, which also sits on a wooden pallet.

So, if you are somewhat handy you can probably make your own.

But the wooden-ware is not too expensive and is easy to assemble.  You can even order a whole "beginners kit" for between $100-$150, depending on what you have in the kit.

Have fun, protect your thumbs, and we will see you around the hive!
tim

2 Comments

Long Live The Queen (Initiative)!

2/16/2013

0 Comments

 
Picture
Time to start thinking about your stock for 2013.  If you have Illinois Queens, your bees are probably doing well.

These gals are stronger and healthier than their cousins from California or Georgia.  So if your queen makes it through the winter, be sure to give her a crown.

The Illinois Queen Initiative (IQI) has grown out of this trend of trying to keep queens locally produced, even within temperature zones in Illinois.  

But the IQI has more in mind than just raising queens that are more cold-hardy. 

Picture
Here are some of the IQI's Goals:
By 2015: Exceed 50% of the demand for queens in Illinois.

Exceed 20% of the demand for nucs or packaged bees (bees provided in bulk by a beekeeper, typically NOT from IL).

Continue training the various methods of
queen rearing to all interested beekeepers
in llinois.

Continue to bring in new genetics as needed in order to enhance current stocks with beneficial traits and avoid the problem of inbreeding.

Continue to test stock for Varroa Mite resistance, hygienic behavior and other positive traits.

Picture
You can join this great organization or help out several ways.  Check out their site at llinoisqueeninitiative.com/

My personal goal is to raise at least one nuc to sell to a new beekeeper in 2013.  This should get them off to a good start.

Beekeepers are learners, experimenters.  It'll be fun to try starting a nuc with a new queen and providing it to a new beekeeper.

I hope you join me in this IQI adventure.

Until then, see you around the hive!
tim

0 Comments
<<Previous
Forward>>

    Author

    Tim M (Bee Keeper)

    Archives

    May 2015
    February 2015
    January 2015
    December 2014
    July 2014
    June 2014
    April 2014
    January 2014
    December 2013
    November 2013
    July 2013
    May 2013
    April 2013
    March 2013
    February 2013
    January 2013
    December 2012
    November 2012
    October 2012
    September 2012
    March 2012
    February 2012
    January 2012

    Categories

    All
    Basics
    Bee Gum
    Beekeeping
    Bees
    Candy Board
    Capture
    Cold Weather
    Colony
    Drone
    Feral
    Green Foundation
    Harvesting Honey
    Hive Body
    Lesson Learned
    Mentoring
    Mite
    Pollen Patty
    Population
    Queen Bees
    Queen Initiative
    Screened Bottom Board
    Smoker
    Stings
    Stores
    Sugar Patty
    Swarm
    Swarm Box
    Swarms
    Wood-working

    RSS Feed

Contact Lincoln Land Bee Keepers Association
P. O. Box 20402, Springfield,  IL  62708


Contact Webmaster
Copyright © 2013, 2014, 2015 & 2016. All Rights Reserved  -   Lincoln Land Bee Keepers Association - P.O. Box 20402  - Springfield, IL  62708
✕